Hole 1 Par 4
Description
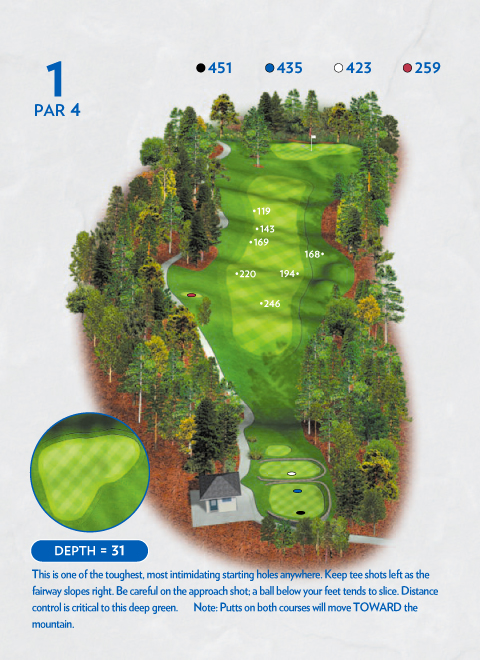
This is one of the toughest, most intimidating starting holes anywhere. Keep tee shots left as the fairway slopes right. Be careful on the approach shot – a ball below your feet tends to slice. Distance control I critical to this deep green. Note: putts on both courses will move TOWARD the mountain.
| Red | 259 |
| White | 423 |
| Blue | 435 |
| Black | 451 |
Hole 2 Par 4
Description
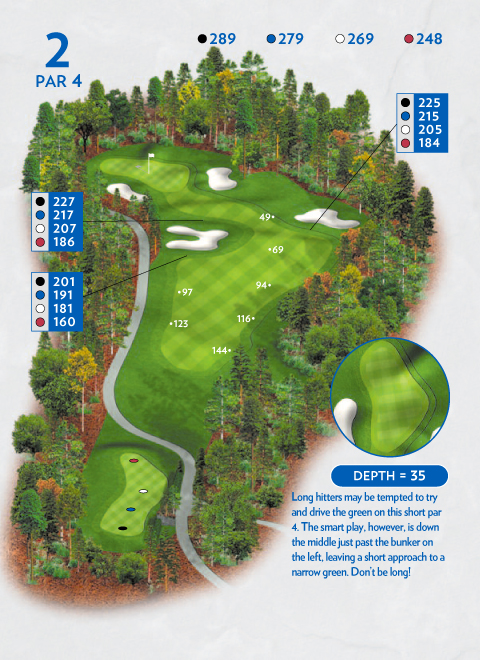
Long hitters may be tempted to try and drive the green on this short par 4. The smart play, however, is down the middle just past the bunker on the left, leaving a short approach to a narrow green. Don’t be long!
| Red | 248 |
| White | 269 |
| Blue | 279 |
| Black | 289 |
Hole 3 Par 5
Description
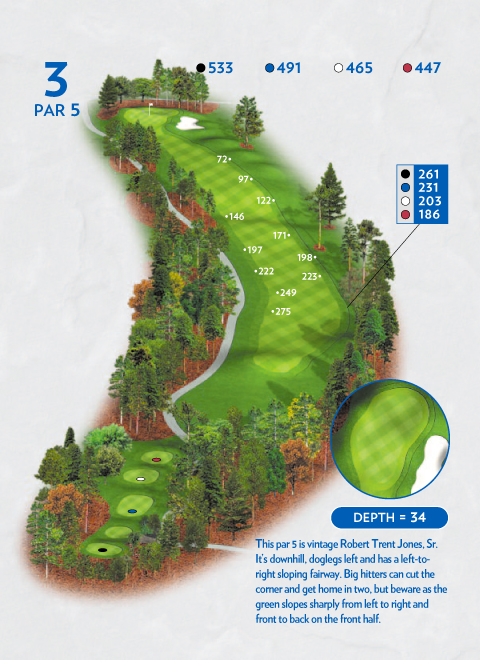
This par 5 is vintage Robert Trent Jones Sr. It’s downhill and doglegs left and has a left-to-right sloping fairway. Big hitters can cut the corner and get home in two but beware as the green slopes sharply from left-to-right and front-to-back on the front half.
| Red | 447 |
| White | 465 |
| Blue | 491 |
| Black | 533 |
Hole 4 Par 4
Description
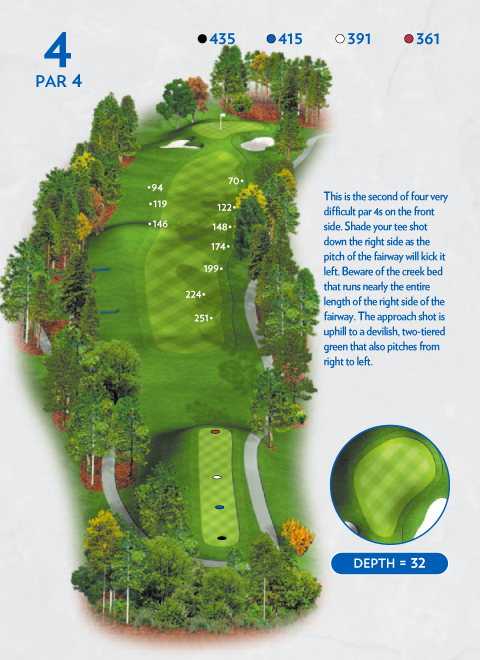
This is the second of four very difficult par 4s on the front side. Shade your tee shot down the right side as the pitch of the fairway will kick it left. Beware of the creek bed that runs nearly the entire length of the right side of the fairway. The approach shot is uphill to a devilish, two-tiered green that also pitches from right to left.
| Red | 361 |
| White | 391 |
| Blue | 415 |
| Black | 435 |
Hole 5 Par 4
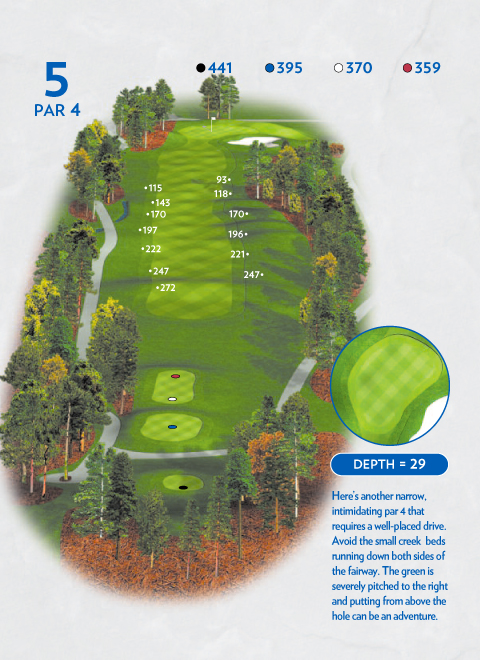
Description
Here’s another narrow, intimidating par 4 that requires a well-placed drive. Avoid the small creek beds running down both sides of the fairway. The green is severely pitched to the right and putting from above the hole can be an adventure.
| Red | 359 |
| White | 370 |
| Blue | 395 |
| Black | 441 |
Hole 6 Par 3
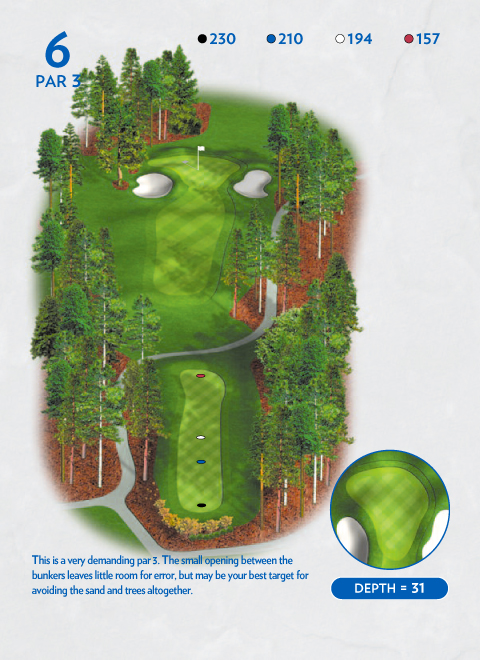
Description
This is a very demanding par 3. The small opening between the bunkers leaves little room for error but may be your best target for avoiding the sand and green altogether.
| Red | 157 |
| White | 194 |
| Blue | 210 |
| Black | 230 |
Hole 7 Par 4/5
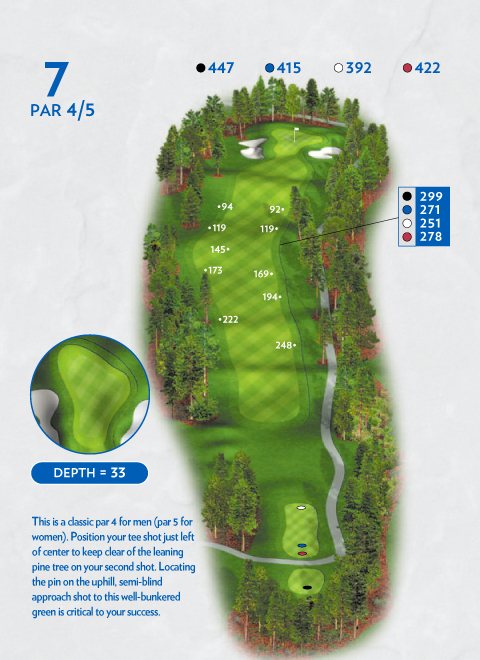
Description
This is a classic par 4 for men (par 5 for women). Position your tee shot just left of center to keep clear of the leaning pine tree on your second shot. Locating the pin on the uphill, semi-blind approach shot to this well-bunkered green is critical to your success.
| Red | 422 |
| White | 392 |
| Blue | 415 |
| Black | 447 |
Hole 8 Par 3
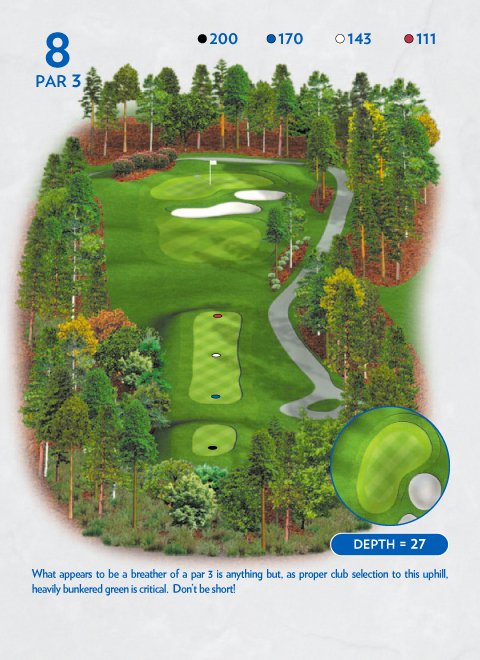
Description
What appears to be a breather of a par 3 is anything but, as proper club selection to this uphill, heavily bunkered green is critical. Don’t be short.
| Red | 111 |
| White | 143 |
| Blue | 170 |
| Black | 200 |
Hole 9 Par 4
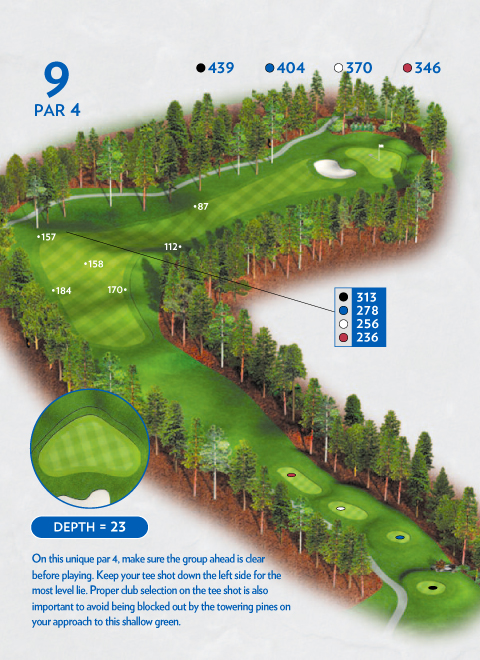
Description
On this unique par 4, make sure the group ahead is clear before playing. Keep your tee shot down the left side for the most level lie. Proper club selection on the tee shot is also important to avoid being blocked out by the towering pines on your approach to this shallow green.
| Red | 346 |
| White | 370 |
| Blue | 404 |
| Black | 439 |
Hole 10 Par 3
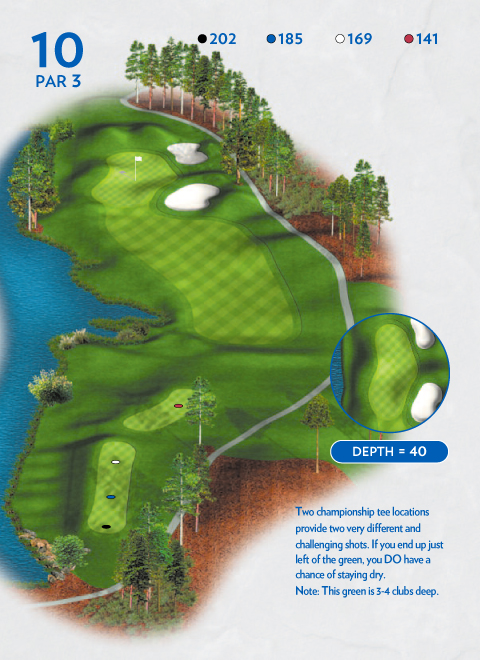
Description
Two championship tee locations provide two very different and challenging shots. If you end up just left of the green, you do have a chance of staying dry. Note: This green is 3-4 clubs deep.
| Red | 141 |
| White | 169 |
| Blue | 185 |
| Black | 202 |
Hole 11 Par 4
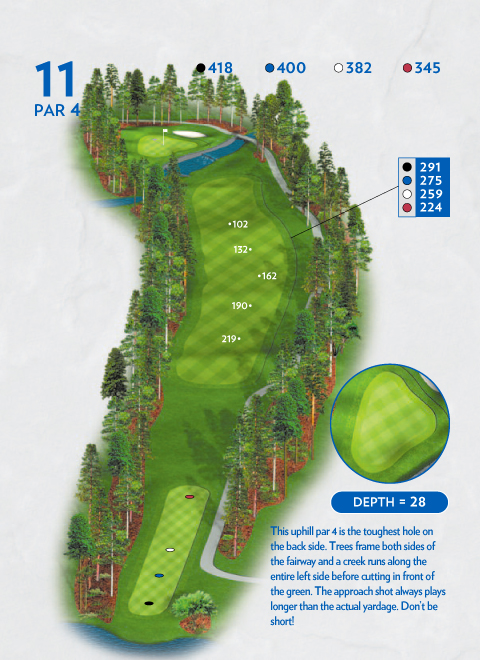
Description
This uphill par 4 is the toughest hole on the back side. Trees frame both sides of the fairway and a creek runs along the entire left side before cutting in front of the green. The approach shot always plays longer than the actual yardage. Don’t be short!
| Red | 345 |
| White | 382 |
| Blue | 400 |
| Black | 418 |
Hole 12 Par 4
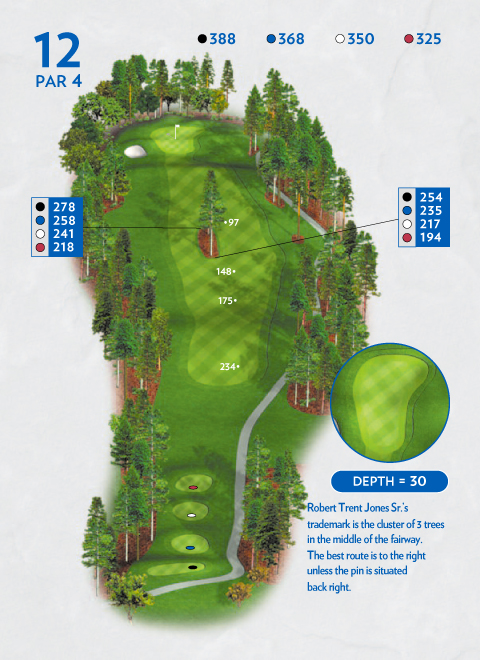
Description
Robert Trent Jones Sr’s trademark is the cluster of three trees in the middle of the fairway. The best route is to the right unless the pin is situated back right.
| Red | 325 |
| White | 350 |
| Blue | 368 |
| Black | 388 |
Hole 13 Par 4

Description
Another of Jones’ trademarks is long, runway tee boxes as evidenced here. Thread your drive between the bunker and the large oak tree on the left for the best line of approach to an angled, two-tiered green.
| Red | 350 |
| White | 387 |
| Blue | 400 |
| Black | 417 |
Hole 14 Par 4
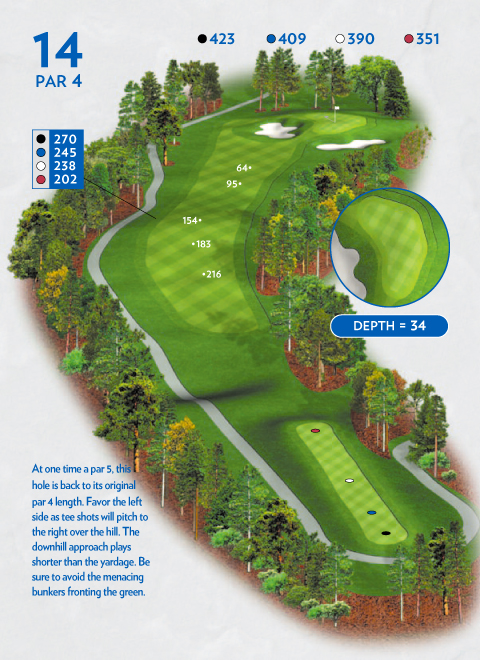
Description
At one time a par 5, this hole is back to its original par 4 length. Favor the left side as tee shots will pitch to the right over the hill. The downhill approach plays shorter than the yardage. Be sure to avoid the menacing bunkers fronting the green.
| Red | 351 |
| White | 390 |
| Blue | 409 |
| Black | 423 |
Hole 15 Par 4
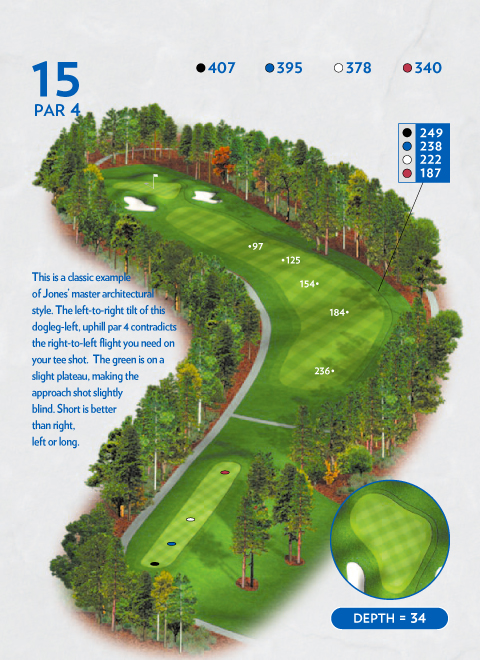
Description
This is a classic example of Jones’ master architectural style. The left-to-right tilt of this dogleg-left, uphill par 4 contradicts the right-to-left flight you need on your tee shot. The green is on a slight plateau, making the approach shot slightly blind. Short is better than right, left or long.
| Red | 340 |
| White | 378 |
| Blue | 395 |
| Black | 407 |
Hole 16 Par 3
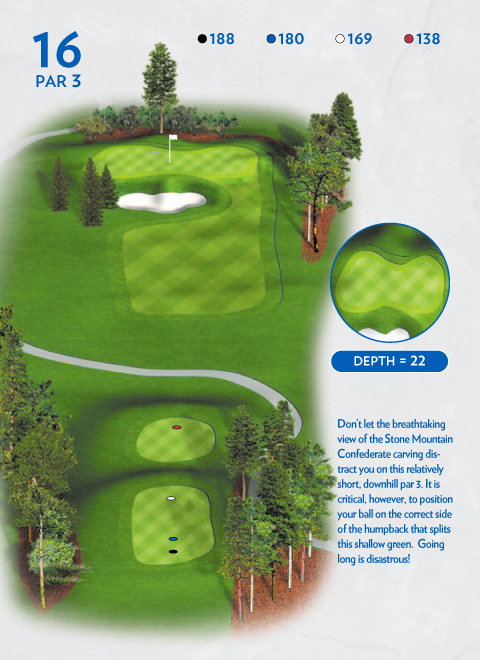
Description
Don’t let the view of Stone Mountain distract you on this relatively short, downhill par 3. It is critical, however, to position your ball on the correct side of the humpback that splits this shallow green. Going long is disastrous!
| Red | 138 |
| White | 169 |
| Blue | 180 |
| Black | 188 |
Hole 17 Par 4
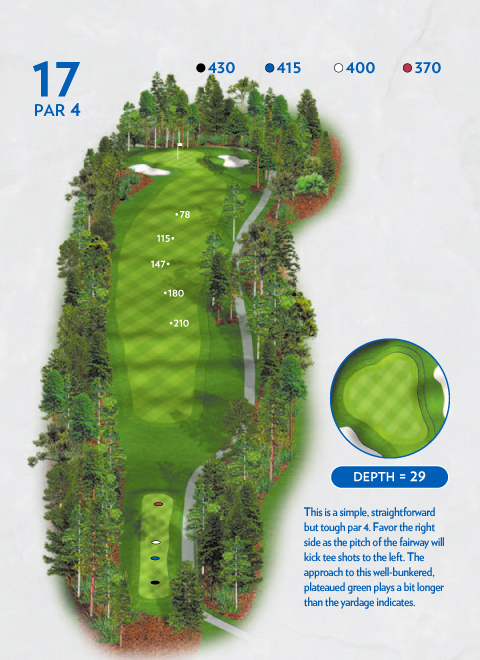
Description
This is a simple, straightforward but tough par 4. Favor the right side as the pitch of the fairway will kick tee shots to the left. The approach to this well-bunkered, plateaued green plays a bit longer than the yardage indicates.
| Red | 370 |
| White | 400 |
| Blue | 415 |
| Black | 430 |
Hole 18 Par 5
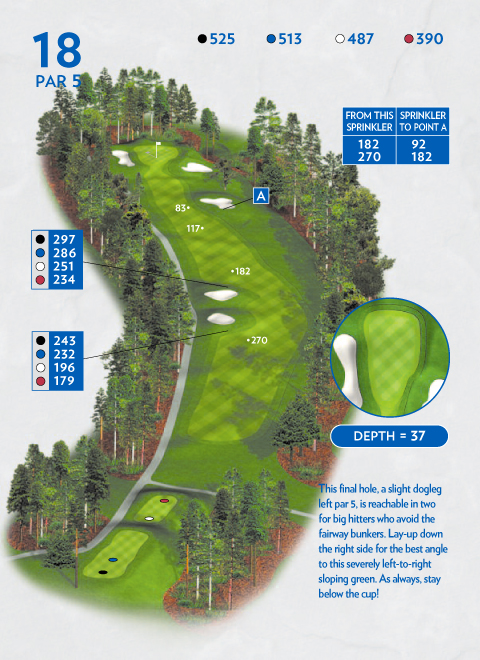
Description
This final hole, a slight dogleg left par 5, is reachable in two for big hitters who avoid the fairway bunkers. Lay-up down the right side for the best angle to this severely left-to-right sloping green. As always, stay below the cup.
| Red | 390 |
| White | 487 |
| Blue | 513 |
| Black | 525 |
